Did you know that about 25% of homes will face structural distress?
That’s a lot.
You might also be surprised to know that Texas is #1 in foundation failures, which can lead to between $3,000 – $7,500 in repairs and can reduce your home’s value. One of the main culprits for this is shifting soil caused by uneven moisture levels. Thankfully, there are a couple of ways you can take control of those moisture levels to protect your foundation from shifting. In this blog post, we’ll show you the first of two things you can do yourself to protect your home (and your wallet).
Protecting Your Foundation Part One: Installing a Drip Irrigation System
The first way you can protect your foundation is by installing a drip irrigation system.
You see, when it gets hot outside (and in North Texas, it WILL get hot outside!), the soil along the perimeter of the home will dry up, while the soil under the home will stay moist. This will cause the foundation to sag along the home’s exterior walls.
The drip line is a low-pressure, low-volume watering system that can be buried around the home to maintain even moisture levels throughout the entirety of the home. To save yourself a lot of money and headache in the future, you can install one yourself with a short list of supplies from your local home improvement store and a little bit of elbow grease!
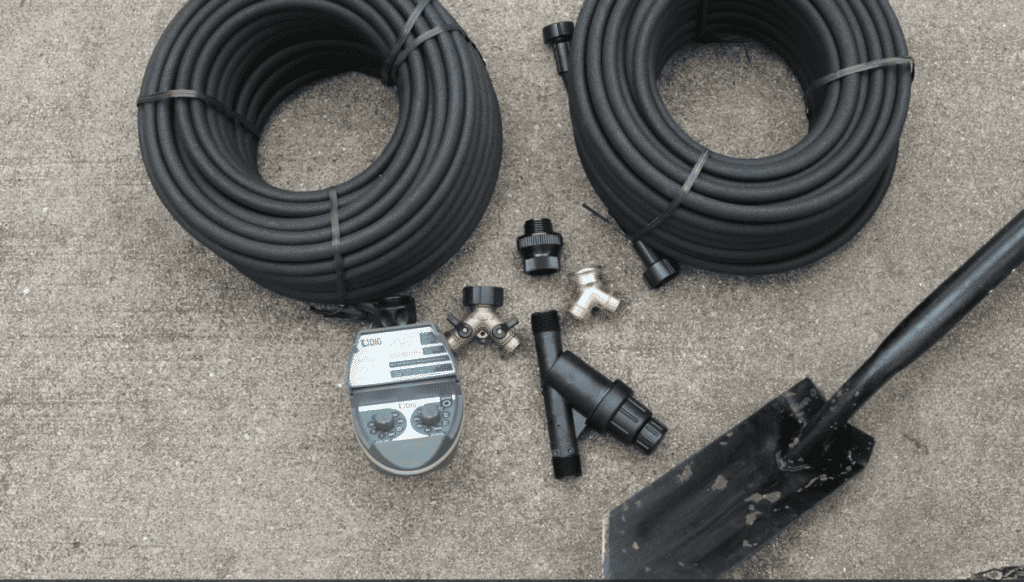
Here’s what you’ll need:
- Two Soaker Hoses
- A Backflow Valve
- Two Y Connectors
- A Hose Timer
- A Filter & Pressure Regulator
- A Trench Shovel
Step 1: Choose Your Water Source
Your first step is locating a faucet that is relatively centralized on the home. You’ll hook everything up to this faucet.
Step 2: Assemble Your Irrigation System
Now that you have your faucet, you’ll want to start attaching your pieces together to create your
irrigation system. First, the backflow valve, then one of your Y connectors, next the timer, then the filter & pressure regulator, then the second Y connector, and finally your soaker hoses which will go two different ways around the house. Note: you’ll want to make sure when purchasing your hoses that the entirety of your home’s perimeter will be reached with the length of the hose you purchase.

Step 3: Bury Your Hoses
Now you’ll dig a 6-inch trench approximately 12-18 inches away from the foundation all the way around your home. You’ll then bury your soaker hoses in this trench. By burying the hose, you’ll save water and protect the hose, extending its life.
Step 4: Set Your Timer
Now that your hoses are in the ground, you’ll want to set your timer. Typically, you’ll want to run the system 2-3 times per day for about 10-15 minutes each time. However, this will vary depending on soil, climate, and time of year. The goal here is to have the soil moist, but not muddy. If you see the ground pulling away from the foundation, run the system longer. But, if you can stick a screwdriver in the ground and it makes a slurp noise when you pull it out, then you’ll want to decrease the system’s run time. Be sure to check these conditions at least once per quarter.
Helpful tip: Don’t forget to change your filter once per year!
Seeing that repairing a foundation can cost up to tens of thousands of dollars, this DIY project is a no-brainer! So, protect life’s biggest investment and keep that foundation nice and level. You can check out this DIY tutorial on YouTube, and you can find part two of Protecting Your Foundation here.